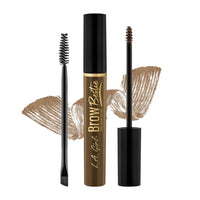


Brows make or break your look in general. If you are doing the right job, they will frame your face and create the polished look you want. Not everyone is blessed with perfectly chiseled brows, but thankfully, that's where a brow pencil comes into play. Whether it's filling sparse areas or just defining arches, the right techniques make all the difference. Let's learn how to use a brow pencil with LA Girl Pakistan to draw perfectly defined yet natural-looking brows.
Step 1: Select the Correct Brow Pencil
Before doing anything in terms of drawing on your brows, you need to select the correct brow pencil color. It should be a shade as close as possible to your natural brow color or only a bit lighter to create a softer look.

Step 2: Prep Your Brows
Clean and neat brows are the best painting canvas. If you’re unsure about where the arch should be, a quick trick is to align a pencil from the edge of your nose to the outer corner of your iris. This will mark the ideal spot for your brow's arch.

Step 3: Fill in Sparse Areas
Once your outline is in place, it’s time to fill in the gaps. With light, short strokes, fill in the sparse areas between your outline. Don't be too harsh, because the concept is to somehow reconstruct the direction your brow hair grows in. From the back of the tail all the way to the middle this gives a very soft and subtle effect.
The secret here is to keep the fill as natural as possible. If your brows are already thick, you might just need to add some definition in some areas. If they're thinner, make sure that you focus on filling the gaps while keeping their shape.

Step 4: Blend with a Spoolie
Fill out your brows with the pencil and then take the spoolie again and brush through the brow. This blends the pencil into the brow hairs so that it softens any sharp lines and makes your strokes look more natural. Brushing also ensures that the product is distributed evenly so that your brows look fuller yet soft.
Once your brows are filled and blended, set them in place with a clear or tinted brow gel. Run the brush through your brows to keep them in place. This means if you're sweating or feeling a gust of wind, that brow pencil is not going anywhere. Brow gel also gives a nice finish to the look of the brows, keeping them slightly more finished.

Step 5: Clean Up the Edges (Optional)
To achieve more accuracy, you can soften the edges of your brows with concealer or even a light foundation. You'd find that the silhouette of your outlines is even sharper and the look defined well in case you do intend to appear more daring. You just use a tiny brush and effectively apply it to your skin without bringing any lines that look very apparent.

Step 6: Practice Makes Perfect
The better you are with a pencil doing your eyebrows, the more you will know your natural shape and how to create and enhance it. It will take a little time to get it just right-not too tight or not too loose-but that's okay. Try experimenting with pressure levels and strokes to see what works for you best.

Conclusion
It's very simple to achieve defined and natural-looking brows that frame your face and give you the boost that an individual needs by using a brow pencil. The beauty lies in the details: start off with light strokes and then gradually add on the product. For that soft everyday look or a more defined style, the brow pencil is the one versatile tool that can help get you started on making those brows perfect!